
Appearance
How-To: Create a Pin Rule
Pin Rules are a type of Merchandising Rule that pin one or more Entities to a specific spot in a Recommendation. This guide aims to explain how you set up such a Rule, what you need, what the pitfalls are, and what you can't do with a Pin Rule.
Why a Pin Rule?
Pin Rules are useful for ensuring that a specific Entity is shown somewhere. Because it doesn't rely on the variability of Relevance and Popularity, it can be used to ensure that, e.g., two Products are linked together, or that when a certain Product is added to the basket, a specific complementary Product is shown.
Pin Rule Fundamentals
The Pin Rule functions by specifying one or more Entity IDs to be pinned in the Recommendation, which are then pinned in order. Note that you can only specify actual IDs, and not things like Product Data.
What Pin Rules Cannot Do
- Pin Rules cannot pin Entities in a Search.
- Pin Rules cannot pin a group of Entities based on a Data Key, Variant Specification, etc.
- Pin Rules cannot pin a single position to "alternate" between multiple Entities; if multiple Entities are selected to be pinned, they will start at the position specified in the Rule, and occupy the subsequent positions. For example, pinning three Products to Position 1 will result in a Recommendation showing Product A, Product B, and Product C one after the other, rather than alternating the first spot between the three.
Pin Rule Restrictions
Unlike other types of Merchandising Rules, Pin Rules can only apply to Recommendations.
Creating Your Pin Rule
To create a Pin Rule, you'll need a few fundamental things:
- The affected Recommendation Type, if you don't want the Pin to be universal for all your Recommendations.
- The Rule Scope, such as Locations, Languages, or Currencies.
- The Viewing Context, when pinning for specific Recommendation Types
- the ID(s) of the Entities you want to pin
Identifying Your Recommendation
In order to know what type of Recommendation you need to Merchandise on, you will need to identify it via the My Relewise UI. You do this first by retrieving your User ID, and then grabbing your Recommendation Request from your website.
We do this because you may use several different Recommendation types on the same page - for instance, it is common on a PDP to have both a ProductViewedAfterViewingProduct and a RecentlyViewed or PopularProducts with a category filter. By knowing your User ID, it becomes easier to isolate the type of Recommendation you are affecting, as well as testing the Recommendation later.
Retrieving your User ID
To retrieve your User ID in order to identify your Recommendation types, do the following:
- In one browser window/tab, open the My Relewise Search Overview page
- In a second browser window/tab, open your website
- Now we want to find your User ID. Enter a search into your website's search bar, and immediately refresh the My Relewise Search Overview page. You should be able to find your search without too many issues - for ease of use, try entering something distinct, like a string of nonsense characters, e.g., "qweqweqwe"
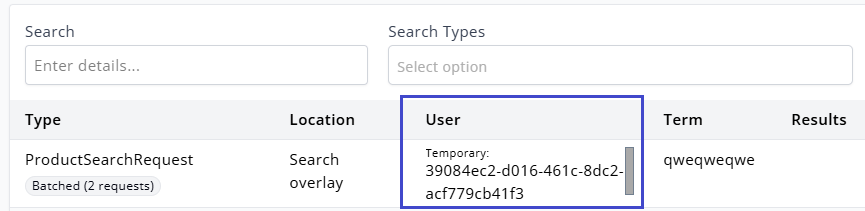
Searching for a distinct string makes it easier to identify your own user among the rest.
You are looking for the information contained in the User field - copy this and keep it handy (Hint: You can click on the User ID to open up a User Entity modal, and copy the ID directly from there):
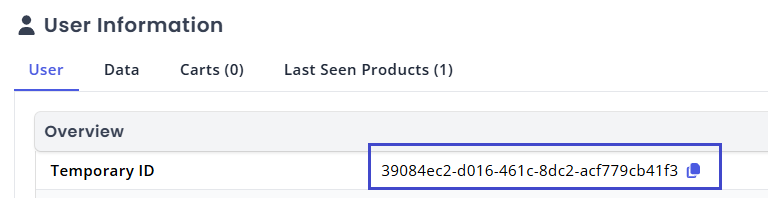
Grab the User ID directly from the User Entity modal
No User ID
If your solution does not allow you to grab a User ID for whatever reason, you can still follow the rest of the steps in this guide - you just have to manually figure out which of the requests in the Overview page is yours. There is no shortcut to this without the User ID available - look at the Product results on the overview page, and compare them with the Products being shown on your Product category page. If they are the same, you have found your request.
Identifying the Recommendation Type
With your User ID in hand, you will be able to go to the Recommendations Live View page, and filter on your ID directly. Then, go to the frontend page where your Recommendation is being shown, and refresh the page. Likewise refresh the Live View page, and you will see your recommendation in the overview:
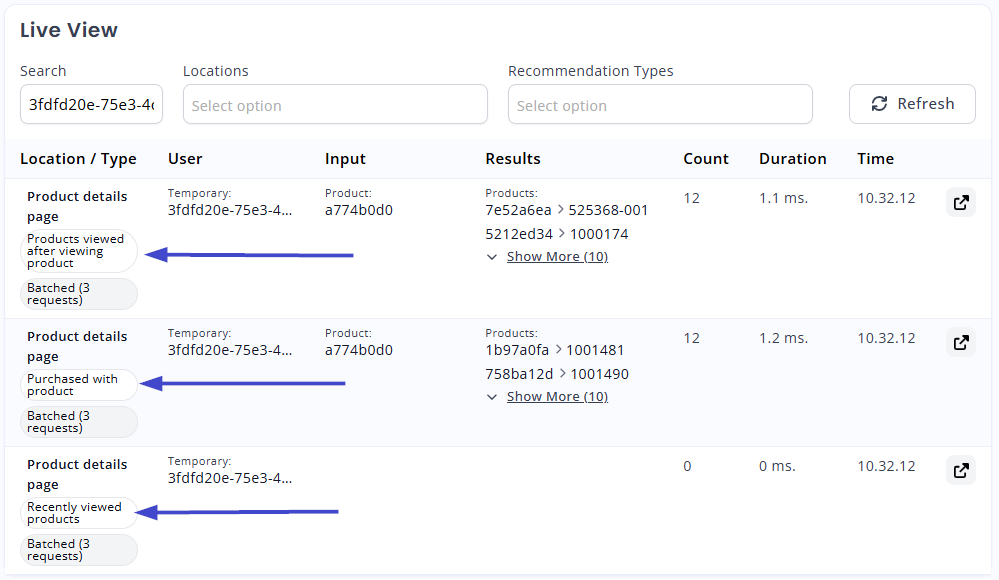
You can identify your Recommendation Type(s) by using the Live View page.
If you have multiple Recommendation types firing in the same request, you can inspect the first two or three Products in the results and match them to the Products being shown on your frontend page. This will help you identify which specific Recommendation band you will want to Merchandise on.
Rule Scope
If you wish to affect all Recommendation requests sent to Relewise, simply leave the Rule scope blank — no selection automatically includes all Recommendation types.
Alternatively, check off the type(s) of Recommendations that you wish to affect. If you are unsure about the type of Recommendation requests you are using, you can refer to the Live View page for Recommendations, and cross-reference the incoming request types against the list of available options in the Merchandising interface.
Viewing Context
For certain Recommendation types, such as PurchasedWith or ProductViewedAfterViewingProduct, you may specify an additional Viewing Context, which defines that the Rule should only take effect when the Viewing Context prerequisites are met. This lets you specify that it should, for instance, only apply to Recommendations shown on Products that belong to a certain Product Category, or on a specific Product's PDP, or similar. Viewing Context is a powerful tool for creating direct Product relations, such as by pinning a specific Product on the Product Page of every Product belonging to a certain Brand, or to match specific Product types to a particularly well-suited matching Product.
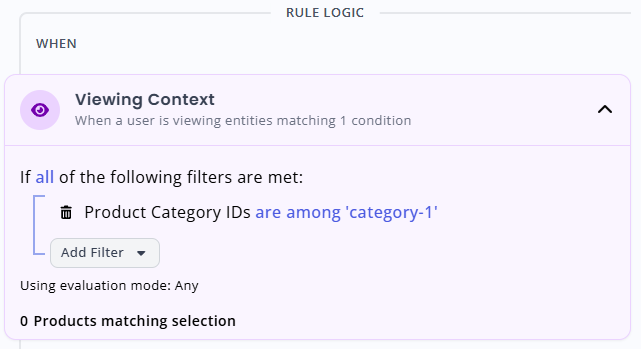
An example of a Viewing Context specifying that the Rule only applies to Products belonging to Product Category ID "category-1".
Target Entities
For Pin Rules, you are limited in what Entities you can target. The UI helps you; depending on the type of Recommendation you are Merchandising on, the UI will restrict itself to only show the types of Entities targetable by that Recommendation Type (e.g., ProductViewedAfterViewingProduct can only target Product Entities).
Beyond that, however, a Pin Rule can only ever target in one of four ways:
- Product ID
- Product Category ID
- Content Entity ID
- Brand ID
Note that pinning a Product Category ID does not mean pinning the Products from the Category to the position. It refers specifically to the Category ID for the purpose of, e.g., a PersonalProductCategory Recommendation.
If you select more than one Entity ID, the IDs will be displayed in order, starting from the pinned position specified. This means that selecting two Product IDs, prod-a and prod-b for pinning at position 1, would place prod-a in position 1, and prod-b in position 2. It is not possible to create a Pin Rule that "carousels" between a number of Products in the same position. For that reason, it is generally recommended not to pin more than one Product at a time.
Position to Pin At
The Position to Pin At field allows you to specify where in the Recommendation results list you want to pin your Entity(/-ies). Note that this is contingent on the position being available; if you pin something at position 10, but only return eight Entities, the pin will take up the last space in the list.
As mentioned above, specifying multiple Entity IDs to Pin will result in them being pinned one after the other in order, starting from the specified Pin position.